Tie-dye isn’t a new concept. It’s a centuries-old affordable and effortless fabric dyeing technique that even your kids can try as mine do every other weekend. It transforms your dull clothes into a sundress to put on a beach.
You just need some basic supplies to get started. These include – any suitable fabric, vibrant tie dyes, and additional tools depending on your desired design. That’s all I usually have to select before every tie-dyeing session with my kids.
Though there are good readymade and vibrant tie dyes available online, I prefer making one myself for that catchy starburst design in my fabric.
Do you also wonder how to make your tie dye?
No worries, below is a comprehensive step-by-step procedure to prepare unique tie-dyes at home and which fabric to choose, among other essentials. So, let’s start.
Can You Make Homemade Dye For Tie Dying?
Yes, you can make homemade dye for tie-dyeing your clothes.
Mix at least 16 drops of any high-quality food color into half a mug of water to make any vibrant homemade dye. Alternatively, you can also combine the food colors and water in a squeeze bottle. While doing so, make sure to shake it well for perfect consistency.
That’s the easiest way to make homemade dye.
How Do You Make A Liquid Dye?
There are three main methods to make a liquid dye. Read on to know more about these.
Method 1 – Fabric Paint
Add a cup of water and three spoons of fabric paint to a spray bottle. You’ll need different spray bottles for other colors.
If you’re looking for a less vibrant shade, add less paint or only two spoonfuls of the fabric color, as it’ll give you a pastel shade.
Give the spray bottle a good shake for the water and the paint to mix well. Make sure you achieve a uniform mixture that is a solid shade.
Also, close the cap tightly so that you don’t make a mess.
Method 2 – Chemical Water And Dye
Always wear gloves for safety precautions while using this method.
Prepare the chemical water by adding two teaspoons of Ludigol, a water softener, and three-fourths of a cup of urea to a quarter bucket of lukewarm water. You can also add more ingredients mentioned above if you plan to use more dye.
Add the dye to this freshly prepared chemical water depending on how dark you want the shade to look.
The lesser the dye, the lighter the shade, and the more the dye, the darker the shade will appear.
Once the solution is ready, you can store it in a squeeze bottle or a container for future applications.
Method 3 – Food Coloring
This method is my premier recommendation, especially if you’re a beginner. Take a squeeze bottle and add the required water and food color.
As a thumb rule, add eight drops of food color to half a cup of water. You can then adjust the dye depending on your requirements.
If you’re looking for a pastel shade, add less food coloring to the water. Shake the bottle properly until you have a consistent color.
You can now use your dye in a tie-dye project.
How Do You Make Tie Dye Liquid Without Food Coloring?
If you’ve to make tie-dye liquid without food coloring, vinegar is the answer. It makes sure that the shade on your fabric comes out rich and doesn’t wash out thoroughly.
To do so, add equal parts of vinegar and water into a spray bottle or bucket. Mix the solution, and it’s ready to use.
You can now spray the mixture on your fabric or fold it in the desired shape, secure it with some rubber bands, and place it in the bucket of the mix.
What Liquid Do You Use For Tie Dye?
You only need regular water to wash your tie dyed fabric — no detergent is necessary, contrary to what many online resources believe.
Moreover, you can wash your dyed material either in the washing machine or with your hands. For the latter, make sure to soak it in a tub for a while.
You can also use a color fixative after washing the fabric if you feel the color is coming off the fabric.
Once washed and the water starts running clear, dry the cloth as usual.
How To Make Your Tie Dye Liquid With Acrylic Paint?
You can use acrylic paint to tie-dye your clothes as it’ll take them to a whole new level.
All you have to do is mix a considerable amount of glycerin and water into the acrylic paint.
By doing this, acrylic paint will evenly penetrate the fabric. Upon drying, wash it as usual.
How To Make Your Tie Dye Liquid With Food Coloring?
You can make your tie dye liquid with food coloring by mixing an even quantity of water and the desired food color.
Further, I suggest gelatin to make your tie dye liquid using food colors.
If you want to make your dye look brighter or darker, you can add more food colors to the mixture. To achieve pastel shades, cut down the food color’s quantity.
Note: Tie dyeing with food coloring will work only if the fabric material you tend to use meets specific conditions.
How To Make Tie Dye At Home?
If you want to reuse your old cotton t-shirts, bedcovers, or napkins, you can simply tie dye them. Here are the simple steps to follow and transform your fabrics.
Supplies required
- Dyes of your choice
- Dye fixative
- Squeeze bottles
- Rubber bands
- Gloves
- Apron
- Plastic sheet
Below is a detailed explanation of every step.
-
Prepare your Fabric
To prepare your fabric for tie dyeing, make sure to get the fabric slightly damp, as the dampness will let the material absorb more dye. Don’t proceed if the fabric is dry!
Tip: You can also wash your old/new fabric beforehand to remove any stains.
-
Prepare the dye
To prepare your tie dye, add a quarter cup of water to the mixing bucket and stir it with a tablespoon of dye. Make sure to mix the dye and water well to get a proper solid color. I usually stir for a few minutes.
You can also add some salt to the mixture to help the fabric absorb more dye and give it a brighter look.
To make your dyeing process more manageable, store the mixture in a squeeze or a spray bottle.
Don’t forget to put on gloves to avoid messing things up. Tie dyeing is a messy affair, you know.
Now, repeat the above procedure for all the colors you will be using.
-
Patterns
To create intuitive patterns on your fabric, you can fold, scrunch, or squish it and secure the fabric with your regular rubber bands.
The tighter the rubber bands, the more undyed fabric you will have between the bands.
Again, ensure to do this while the cloth is damp, as it will help you get control over the material.
Note: The rubber bands used in this step also act as a border for the colors to avoid mixing up.
-
Prepare To Dye The Fabric
Before dyeing your fabric, place a steel rack beneath your fabric to avoid the material from getting over the workspace.
You can either use the spray bottle or squeeze bottle to dye your fabric. Both these types of bottles lend a different look to your fabric. I prefer to put different dye colors between each rubber band for more aesthetic and unique looks.
Now, repeat this process by flipping your fabric to the other side and filling the spaces with the same colors.
You can mix two colors, but always remember the color wheel logic and do not mix colors only to make the fabric look muddy.
Tip: Add the dye fixative after 30 minutes to make your fabric look brighter.
-
Dry Your Fabric
Once you are done with the dyeing and applying the dye fixative, it’s time to place the fabric in a plastic cover and let it dry.
Your project should dry for at least 12 hours to 18 hours. If you feel the color hasn’t set correctly, there’s no harm in stretching the drying period to 24 hours.
Nevertheless, your exact drying time depends on the project’s size and quantity of dye used.
-
Rinse And Wear
Once your fabric has dried, you can now wash your cloth. But remember to use cold water for this purpose.
Make sure to remove all the excess material by gently washing it with your hands. Don’t scrub it too much, as this might take off the color.
After you have washed your fabric, let it dry. You can air dry it as usual.
How To Tie Dye With Food Coloring And No Vinegar?
If you don’t want to dye without using the vinegar at any step, swap it with bleach.
However, remember to use bleach only on dark clothes as it’ll fade out (reverse tie-dyeing technique) the color of your fabric and give a contrasting look instead.
You can soak your fabric in bleach or spray it on your cloth using a spray bottle. While doing this, use protective gear (gloves and/or apron) as it might damage your skin if not handled with care.
What Dye To Use For Tie Dye?
Besides the fabric for tie dye, the dye is another crucial supply you can miss out on. Now, there are tons of dyes to choose from. The essential difference between these is the type of fabric you’ve selected to dye.
Here’s a glance at the most famous dyes you can use for your tie dye projects.
-
Fiber Reactive Dye
Fiber reactive dyes are of two kinds – cold-reactive and hot-reactive.
While cold-reactive dyes are among the most famous fiber-reactive tie dyes, the heat-reactive dye has recently taken the industry by storm due to its bold color options.
In plant-based fabrics like cotton, hemp, and linen, the dye forms a molecular bond with the material’s cellulose fibers. This makes the color very vivid and bold after setting.
Besides their colorfastness, fiber-reactive dyes are also known for their non-toxic nature.
The only downside of reactive fiber dyes is the requirement of soda ash (also known as sodium carbonate) to set.
-
Acid Dye
An acid dye is highly recommended for fabrics such as silk, wool, or all other protein-based fibers.
This form of dyeing requires heat. Hence, you’ll have to dip your fabric into a slightly hot dye for it to penetrate the material. The acid dyes produce gorgeously striking shades for your fabric.
The downside of using an acid dye is they have more dangerous chemicals that might be dangerous for kids.
-
Acrylic Paint
Acrylic paint is water-soluble paint that dries fast and creates crisp stripes when applied using a brush. If you use the paints, you can use them to dye your fabrics.
Remember to purchase a suitable fabric for this type of dyeing and blend the acrylic paint according to the directions mentioned on the package for the best results. If not, any YouTube tutorial will be helpful as well.
The most significant advantage is that it is affordable, readily available, and comes in many colors.
The downside is that the wrong thinning of acrylic paint can create cracks in your pattern.
Tip: You can mix glycerin and water into the thin acrylic paint to make it a suitable coloring agent.
-
All-Purpose Dyes
The all-purpose dye usually requires regular salt to set on the fabric. It’s known for a fast and beginner-friendly dyeing process. And guess what? The dye doesn’t cost much.
They also do not need any additions like soda ash. You have to mix these all-purpose dye powders with water for easier dyeing than professional-grade dyes.
-
Disperse Dyes
Though disperse dye is another excellent option for tie-dying, it isn’t easy to deal with. This is because the dye requires high heat to blend with the fabrics.
The tiny dispersed dye particles dissolve best in only hot water, not cold water. If water isn’t heated well before mixing, the particles will stay afloat throughout the liquid.
The advantage of this dye is that you can dye polyester fabric also. The disadvantage is making patterns is quite tricky.
Note: The dispersed dye has a lot of chemicals that might harm you if you accidentally swallow them.
-
All-Natural Dyes
As the name suggests, natural dyes are extracted from plants or flowers. Beetroot, blueberries, coffee, and purple cabbage are most suited for unique and attractive shades of coloring.
You will have to boil fruit or vegetable and filter them to make the color shade you want. The advantage of using natural coloring is that it contains a different, organic look, is non-harmful, and is an environmentally-friendly process for dyeing.
The disadvantage is that the color is rarely bold, and all shades might not be colorfast.
Tie Dye Patterns – Easy Tie Dye For Kids
There are many tie dye patterns you can create on any random (yet suitable) fabric to give it an exotic look. I have rounded some of my favorite tie dye patterns in a quick step-by-step format.
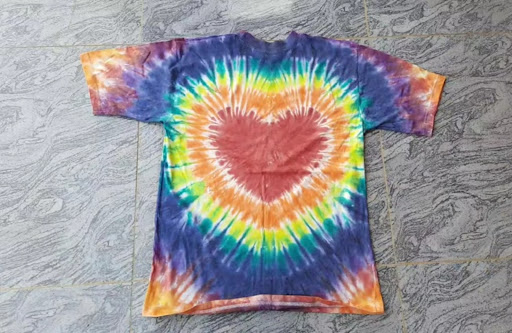
Heart-Shaped Pattern

- Start by cutting a piece of paper into a heart shape.
- Then, fold your fabric in half and draw a heart on the fabric using any washable pen.
- Fold your fabric along the traced line and tie it with a rubber band.
- Add some more rubber bands along the bottom of your folded fabric.
- Once you have secured all the rubber bands, use a dye color to soak every section.
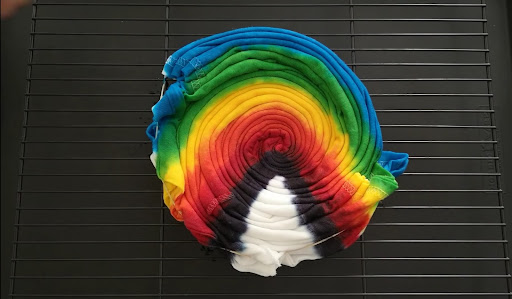
Rainbow Pattern

- Choose the best place on your fabric to create the rainbow, and draw the arches from top to bottom using a washable marker.
- Fold your fabric along the lines for each section.
- The line should be seen appropriately and straight.
- Now, put a rubber band on both lines.
- Decide the number of colors for your rainbow pattern and put more rubber bands between the arches.
- Ultimately, add the dye of your choice to each bump.
Sunburst Pattern
- For the sunburst pattern, fold the fabric in half and also lengthwise.
- Lift the material and secure the fabric with a rubber band. Depending on the number of sunbursts you want, you can do this.
- Put the color dye in the corner of the material and space between each sunburst.
- Add the color dye in the center of each sunburst as well.

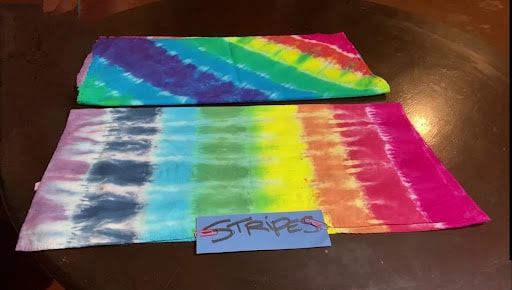
- The stripe tie dye pattern is one of the most straightforward patterns.
- Start folding the fabric from the bottom. It should look like a paper fan.
- Then, tie rubber bands and the dye color of your choice on both sides of the fabric.
Tip: Put on as many shades as you like in this stripe pattern.

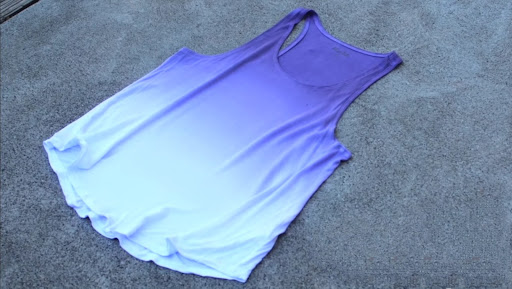
- Ombre helps you achieve a beautiful look with the various intensities of color.
- Apply some amount of the dye straight along the fabric’s edge.
- Then, use wet paint and brush dye using an upward stroke on the fabric.
- Dip the brush in water and brush along with the top of the dye, and pull it upwards to make a gradation of the same color.
How To Make Your Tie Dye Shirt?
Follow the steps below to create an excellent tie-dye shirt for your next beach trip.
-
Workspace
Place plastic sheets or any washable mat on the floor or the tables, as your workspace can get messy during the process.
-
Prepare your Shirt
Pre-wash your shirt by immersing it in warm water, squeeze out all the excess water, and place it flat.
Your shirt must be wet before dyeing it, as the dye will not spread appropriately on dry fabric. Also, soak the shirt in vinegar or salt solution for a few minutes. This will help the shirt absorb more dye.
Note: You can also use the soda ash in your tie-dye kit instead of vinegar or salt solution. Follow the directions on the packaging to mix the soda ash with water.
-
Prepare The Dye
Prepare the dye by mixing it with water by following the instructions given on the packaging. Make sure to mix the water and dye properly to get the proper consistency.
You can also add some salt to the mixture to improve the color.
You can store the leftover dye in squeeze or spray bottles for later use.
-
Design For The Fabric
Choose the design you want, fold your fabric accordingly, and secure them with rubber bands to make the patterns.
-
Tie Dye Your Fabric
You can apply the dye using the squeeze bottle or spray bottle by tracking the tie-dye design. Make sure to apply only one color at a time.
As a thumb rule, start spreading the lighter colors first and then use darker colors as they can be layered over them on the top.
-
Let It Dry
Place the fabric in a plastic bag with all the rubber bands intact. Let it sit for 24-hours for the colors to set. If you’re looking for a pastel shade, you can remove it sooner.
-
Wash The Shirt
Take the rubber bands out from the fabric and rinse the fabric with cold water. Rinse the fabric until the cold water runs clear.
Once washed, air dry the fabric as usual. Don’t apply heat during drying.
Conclusion
So, here you go. I hope this article will help you transform your dull and older clothes into something that no one would have thought of using tie-dye.
You can make your favorite vivid patterns for the fabric by twisting, scrunching, or knotting them. Also, choose the right dye type for the suitable material to get the perfect outcome. If you can’t find one, go through the above tutorial to make your own tie-dye at home.
Have you ever dyed your fabric? What type of dye did you use for your material? Let us know by leaving a comment below!
The post How To Make Your Own Tie Dye Liquid? Step-By-Step Guide appeared first on Art & Craft, DIY ideas and Tutorials - Craftbuds.
