

I have a secret weapon in my kitchen. It makes my daily bread taste amazing (and far more digestible than anything store-bought). As long as I take care of the starter, this weapon is an endless material. And the best part of all? Its free for the taking. Im talking about wild yeast a faithful little organism that can be harnessed by anyone who takes time to get to know it.
The English word yeast comes from the Old English gist and the Old High German jesen which means to ferment. This tiny fungus may very well be the first domesticated organism, having been captured and pressed into service to make alcoholic drinks and bread for humankind for centuries. Without it, life would be a lot less merry and a lot more hungry, thats for sure!
Forming a relationship with wild yeast is a declaration of independence. Once you understand how to use your own locally captured wild yeast strains, youll never need to go to the store to buy yeast again, and youll have truly unforgettable bread and brews in exchange.
For the purpose of this article, I will be describing the means, method, and maintenance of a sourdough starter; the wild yeast thats used to bake delicious bread. For those interested in catching wild yeast to make boozy concoctions, I cannot more heartily recommend Pascal Baudars book The Wildcrafting Brewer.
Where Is Wild Yeast Found?
Defining sources of wild yeast is a bit of a nonspecific endeavor when you think about it, because wild yeasts are everywhere. They form the bloomy layer on wild grapes and blueberries. They can be extracted from pine cones, flowers, or tree leaves. Your skin is even home to different types of yeast.
Wild yeast ubiquity is a confident assurance that you, too, will be able to capture it with ease. As long as you dont live in an autoclave, you will have wild yeast in your environment. Its there in your kitchen. You merely need to give it a nice place to colonize and thrive.
How To Capture Wild Yeast
Im probably going to offend some purveyors of specific sourdough strains with this section, but I dont mind. Come join me in a starter insurrection, and Ill let you in on a little secret: A wild-yeast sourdough starter is so easy to capture, a child could do it with a jar, flour, and water.
Related Post: How To Make Sourdough
You dont need to buy a kit from an online store. You dont need to delve through endless threads on sourdough forums trying to hack the process with pineapple juice, organic grapes, or whey. You dont need to attend some workshop to glean the carefully-guarded, month-long, secret process not available to the non-baking, ignorant hoi polloi. A sourdough starter is dead easy to make and maintain, and it is only a recent phenomenon that this knowledge has dropped out of our culture.
 Heres what I roughly did: I soaked 3 coloured quinoa overnight( dry grains were a 15% of total flour) in water at 1:3 ratio and added little bit of my rye sourdough starter. Next day I mixed 5% of very ripe,rye sourdough starter with 70% water and 25% wholemeal flour( rest was white bread flour) and allowed to ferment for 1h. In meantime I cooked the quinoa in he liquid that was soaking in with 0.5% salt and added camelina seeds towards the end( I didnt weigh them but I reckon probably 5-8%). Once all liquid absorbed I cooled it down. After 1h from mixing the dough I added 2% salt and 5% more water. Mixed in and allowed to rest 10min. Added another 5% water and mixed a bit again. Did some slap and folding and rest 30min. Now added the quinoa and mixed until fully incorporated. Bulk fermented for about 3.5h then divided and preshaped. Rested 1h then shaped and placed in proofing baskets. Proofed for 18h at 5-7C. Baked in preheated cast iron pot(preheating 1h at 250C) 15min 250C with lid and 15min without the lid. Good luck to whoever tries it
  . . . . . #f52grams#thekitchn#huffposttaste#food52#feedfeed#eeeeeats#instayum#yum#food#sourdough#healthyfood#natural#homemade#artisan#breadporn#chefstalk#breadbosses#igbreadclub#opencrumbmastery#wildyeast#fermentation#sourdoughschool#organic#wolfgangsmockmill#artisan#tasty#tartinebakery#soignefood#british#thebakefeed#chlebnazakwasie
I have done a lot of reading on the subject. Baking bread is a daily activity for me, and I have been shocked by how convoluted the process is described in print. Having made dozens of homemade starters over the years that have all produced delicious bread, I am confident that my honed-down, simple process is foolproof for anyone with the attention to see it through.
This is just one of many different methods for catching and using wild yeast, but it works for me as a busy homesteader, and it can work for you too.
Supplies
- 1-quart mason jars (2)
- Non-chlorinated water
- Whole wheat flour or whole rye flour
- Chopstick/non-metal utensil
- Rubber band
- Clean washcloth or double-folded section of cheesecloth big enough to cover the mason jar
- One week of time (or less depending on the weather)
The basic premise is that were going to create an ideal environment for wild yeast to live, and then maintain that environment. If you are new to fermentation, this is going to be a bit of a wild ride, but hang on, its so worth it. Though there may be some weird smells at the outset, the final product is going to be pleasantly fragrant and will raise your home-baked sourdough bread.
Day One
In one of the mason jars, use a chopstick to thoroughly mix 1 cup whole grain flour of your choice with 1 cup of NON-CHLORINATED water. If you have city water, this means you cant run water from your tap straight into the mason jar. The chemicals will kill the wild yeast in your starter.
The whole grains are also important. Though you can technically make a starter with white flour (Ive never tried it), whole grain flour offers better results as it feeds the yeast more complete nutrition.

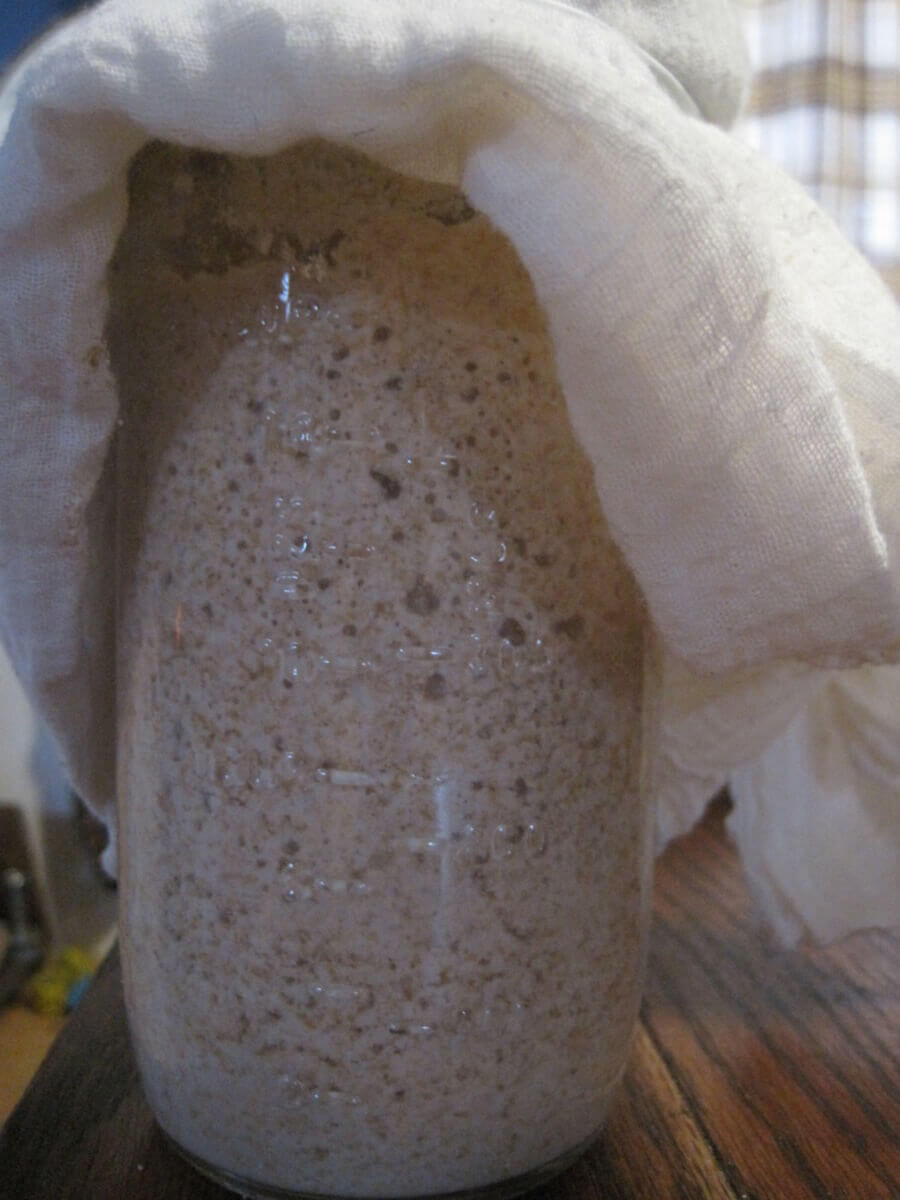
The mix should have the consistency of very thick pancake batter, and youll want to maintain that consistency over the next week. Cover the mix with a cloth secured in place with a rubber band, and set the jar in your kitchen out of direct sunlight, but where you will see it and not forget.
Day Two
Compost half the water and flour mix, and then add cup of water and cup of flour, mixing thoroughly with the chopstick and adding more flour or water as needed to regain that pancake batter thickness. What youve just done is reduce the yeast population by half and provided food for the yeast that remains. This food is what theyll use to grow in strength. Cover again.
Day Three
Depending on the ambient temperature of your kitchen, you may or may not start seeing little bubbles form in your starter when you stir it. There may also be a layer of clear liquid starting to form on the top.
Additionally, you may notice a rather unpleasant smell coming from the jar. If you notice these, take heart! Your starter is alive and beginning the process of becoming stable. Dont worry, that smell is going to change for the better in a few days. And if you dont see these signs yet, no worries. Starters develop more slowly in cooler temperatures, and theres still time to get your wild yeast established.
As on day two, reduce by half, feed, and cover.
Days Four Through Seven
Continue reducing by half and feeding as above. If all is going well, you will start to see your starter change in character. Bubbles will become a regular sight, percolating up like a carbonated milkshake. The clear liquid will also become a normal occurrence. Its the (vaguely alcoholic) waste of the yeast.
Related Post: Bread Proofing
The volume of the batter in the jar will start to increase after a feeding as the yeast produce hundreds of carbon dioxide bubbles (the power to raise bread has arrived). Finally, and most pleasantly, the smell of the jar is going to change dramatically. It will shift from that rotten cheese funk to something that smells downright pleasant like a nice, dark beer or wine.
Days Eight Through Forever
After the mix in the jar has become active, smells good, and has changes in volume after a feeding, give yourself a pat on the back: You have a sourdough starter, and can now decide what to do next. If you bake every day, the starter can live happily on your counter.
Youll want to change out the jar every so often so you dont have a crusty build-up of starter around the opening of the jar (hence the second jar in the supplies list). Now that your starter is fully cultured, you no longer need to compost the reduced starter material. Its what youll use to bake.
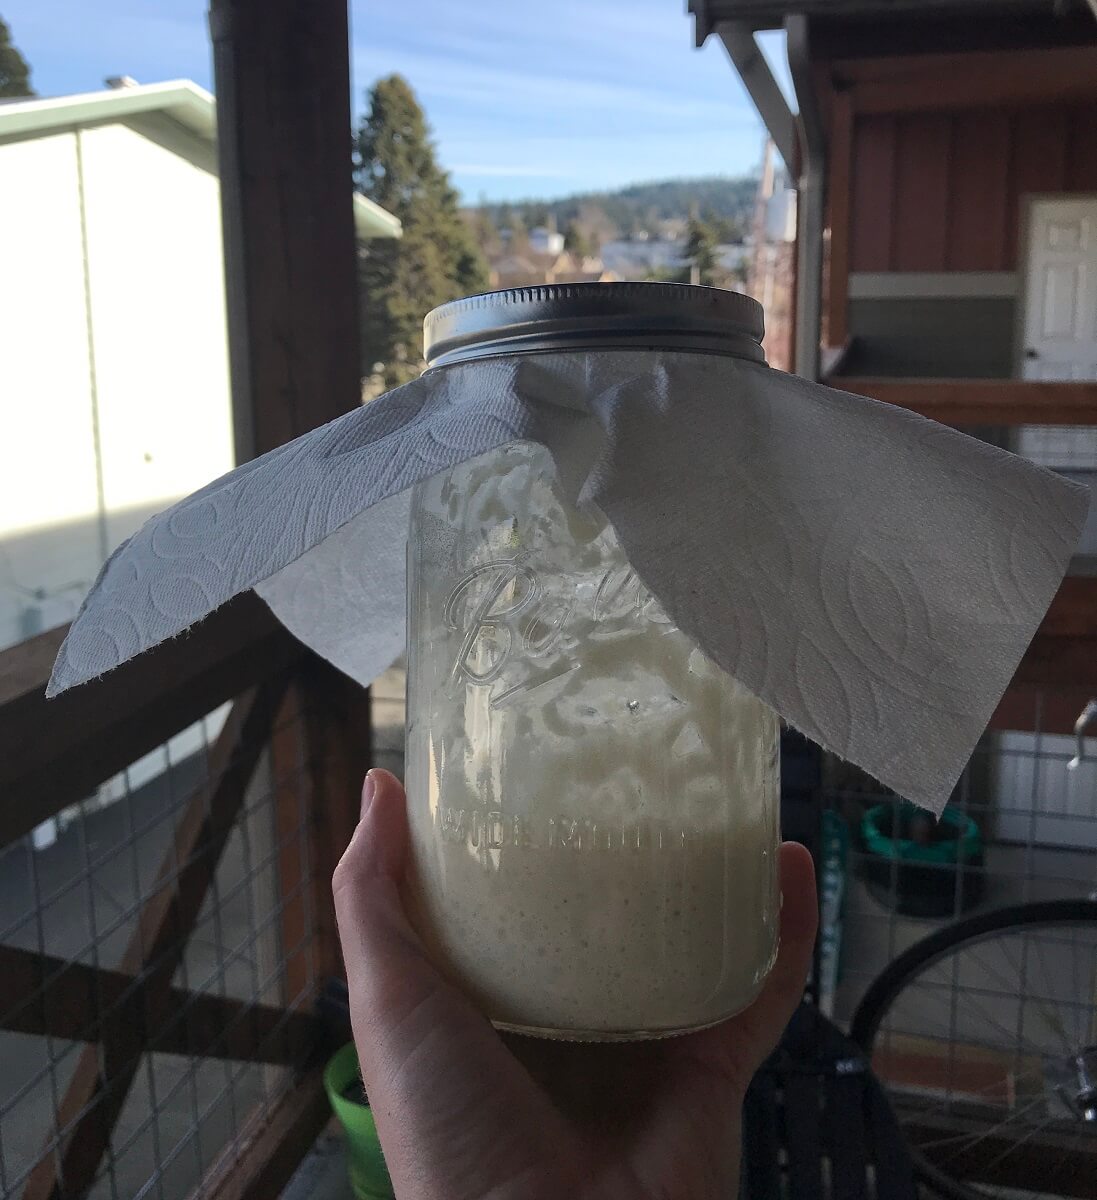
If you bake weekly, you can store the starter in a refrigerator to retard its activity when not in use. Take it out the night before you bake, then reduce and feed it enough that youll have plenty for breadmaking. After you bake, feed the starter again before putting it back in cool storage.
If you dont bake weekly (maybe you should start), make sure you store the starter in the refrigerator and continue to reduce and feed it at least twice a week to keep it healthy.
As long as you give your starter basic care and attention keeping the jar clean, covering it, reducing and feeding at regular intervals, and of course, baking with it you should have a happy symbiotic relationship for as long as you desire.
Troubleshooting And Common Problems
- Problem: Nasty surprise! The starter has maggots in it.
- Solution: Your starter is ruined. Start over, then cover the new starter with a thicker or more densely-woven cloth. Fruit flies love starter, and theyll go to great lengths to get it.
- Problem: The starter is covered by a layer of clear or yellowish liquid.
- Solution: Your starter is just hungry. The liquid is a byproduct of fermentation, so pour off the layer, reduce by half, and feed.
- Problem: The starter is growing pink, green, blue, white, or black, fuzzy mold.
- Solution: Your starter is ruined. Under-maintenance allowed invading mold to overtake the weakened yeast. Start over, and put your starter someplace where youll remember to feed it daily.
- Problem: The starter is covered with a weird, whitish, skin-like film on top of a layer of liquid.
- Solution: Your starter is REALLY hungry. Kahm yeast (what makes the film) is an indication that your starter needs to be fed ASAP. You may want to give your starter a recovery day before you bake with it again just to get it back to full strength.
- Problem: The starter doesnt seem to be very active.
- Solution: Try feeding the starter whole rye flour (this is starter superfood) or feeding more than once a day. This problem may also be a result of colder winter temperatures. Try storing your starter on the warm top of the refrigerator (as long as you dont forget it).
- Problem: Something else not listed here.
- Solution: Let me know in the comments below! Id be happy to help you however I can.
How To Use Your Wild Yeast Starter
I have forgone store-bought yeast for five years now when I started my sourdough journey, and Im convinced that if you are willing to relearn this whats-old-is-new way of making bread, youll find that store-bought yeast is an unnecessary purchase in your kitchen. Using only a sourdough starter as a rising agent, I can make brownies, cakes, muffins, biscuits, pizza dough, naan, and all manner of sweet and savory breads.
The best way to get to know your sourdough is to bake with it often, and theres no better reason to fire up the oven than to make a homemade loaf of real, whole grain sourdough bread. You can find many, many recipes for making sourdough bread online, so I may as well offer our homesteads super-simple recipe as well.
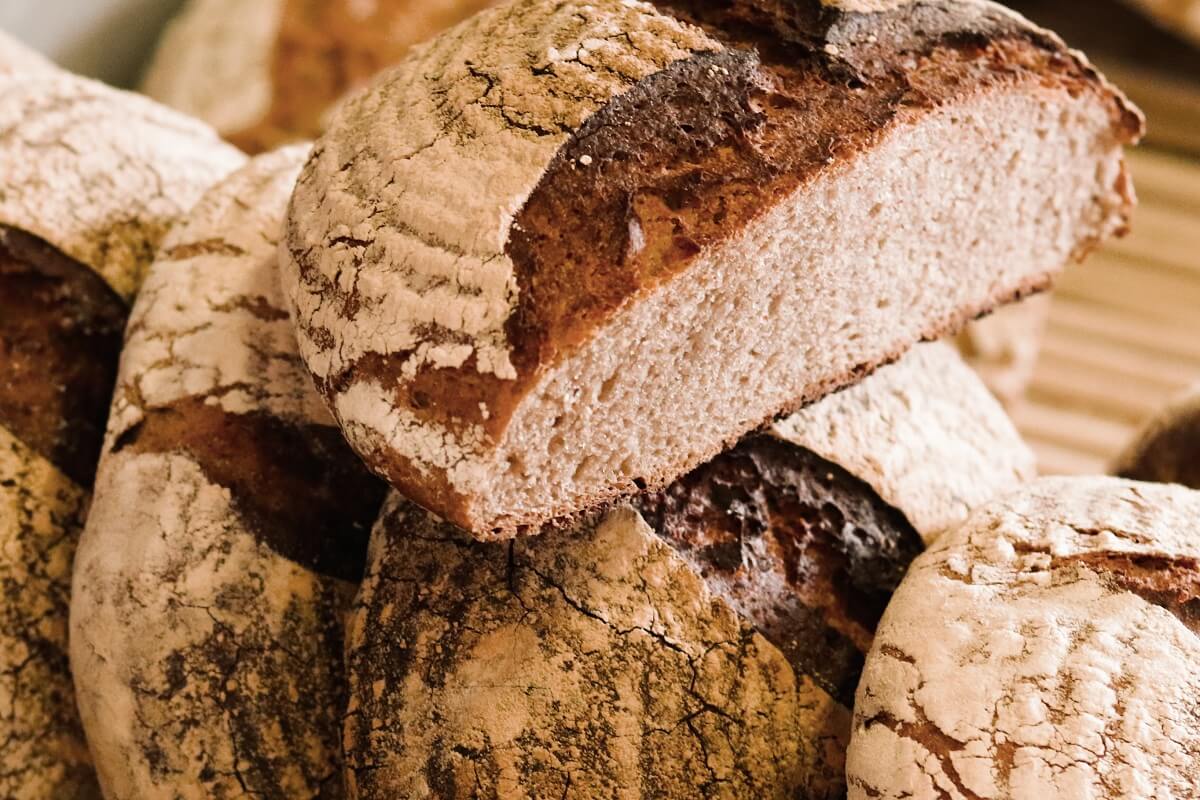
This is a straightforward bread recipe that Ive developed over the years, and even though it only uses four ingredients, it produces a nourishing, delicious loaf that we make nearly every day.
Related Post: 25 Delicious Sourdough Recipes For Your Home Starter
Since it doesnt have an overnight ferment, the resulting loaf is hardly sour, and perfect for pretty much any use. It is 100% whole grain and wont make the exact same lacquer-crust and a spongy interior that you may expect from a commercial bakerys white sourdough, but you cant beat the flavor and nutrition.
Ingredients
- 8 ounces recently fed starter (basically 1 cup)
- 3 cups whole wheat flour (increase to 4 cups if you grind your own) *
- Filtered water/non-chlorinated water (start with 1 cup youll need more)
- 2 teaspoons salt
- Cornmeal for dusting baking surfaces
*NOTE: If you have the option to grind your own flour, I recommend grinding a combination of 3-parts organic hard red winter wheat to 1-part organic rye grain. This is our favorite combination for a hearty, flavorful, easy-to-knead, and excellently-textured loaf. Its also a really good combination to feed your starter).
Optional, But Helpful Equipment
- Cast-iron cloche
- Danish dough whisk
- Banneton with linen liner
- Pizza peel
- Baking stone
- Instant read thermometer
Directions
1. Remove Your Starter From The Fridge
The night before you bake, remove your starter from the fridge (if applicable), reduce, and feed twice as much as you usually do. I like to have at least 2 (or more) cups of starter available when I begin a baking day.
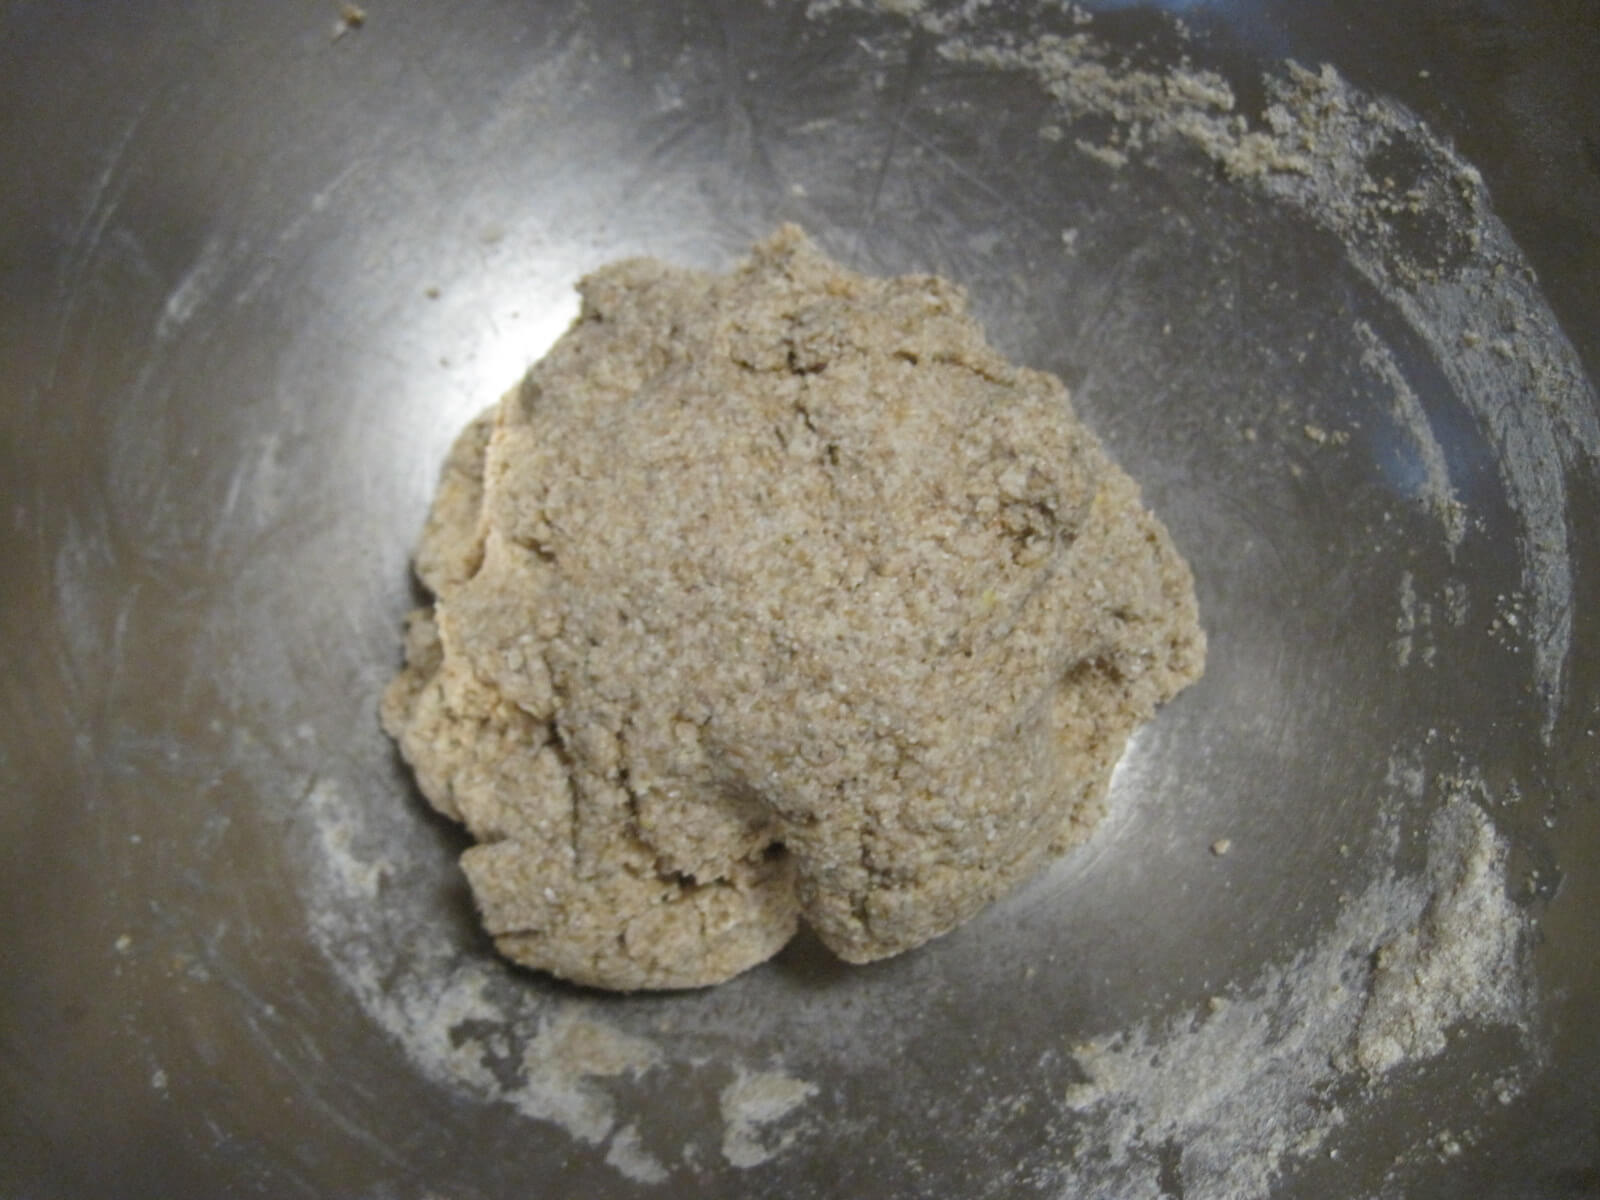
2. Add Flour To A Bowl And Slowly Mix In Water

Place the flour in a large bowl. Slowly mix in enough water to make the dough stick together without being sticky and wet. Its okay if it looks crumbly. Allow to rest for 20 minutes.
3. Add Salt And Starter
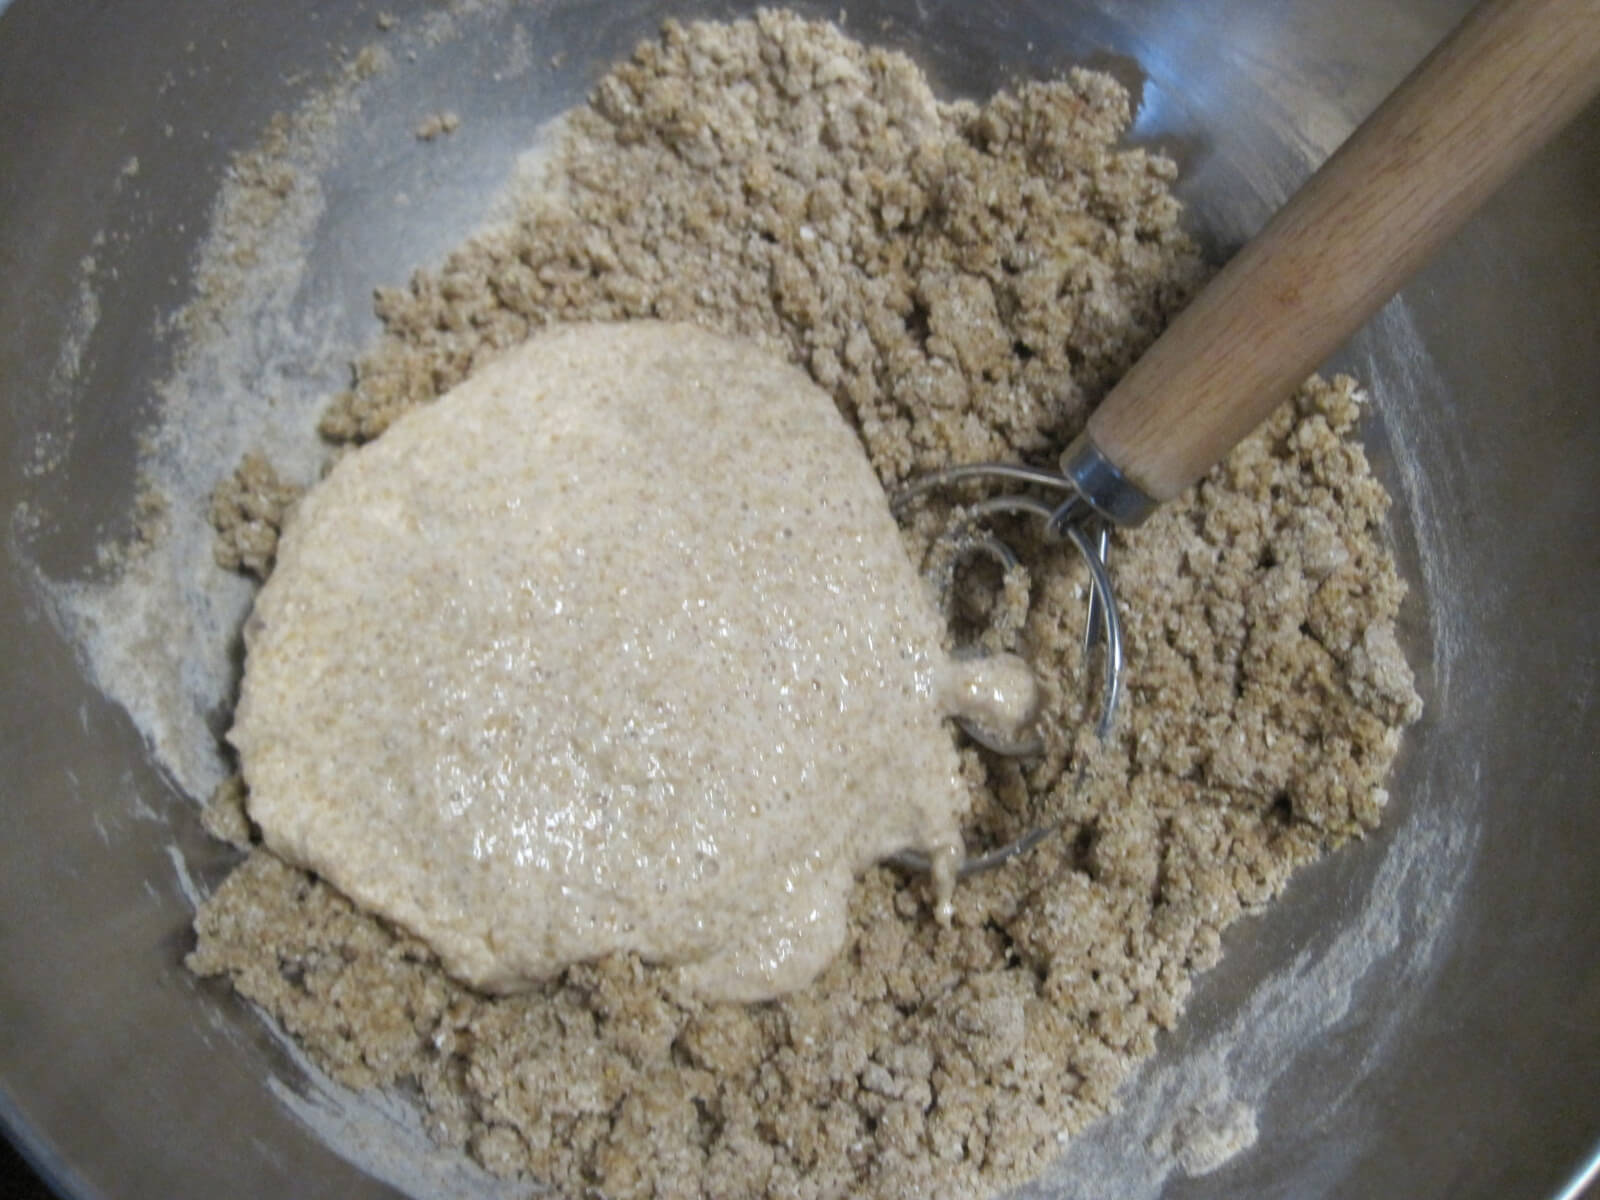
Add salt and starter, and incorporate using your hand until the wet flour begins to merge with the starter. Once they are mixed well, allow to rest for 10 more minutes. Feed your starter in the meantime, and put it back in its place.
4. Knead The Dough
Wet your hands with water, and start to knead the dough in the bowl. Ideally, the dough should be pliable enough to work easily, but not so sticky and wet that it mushes and doesnt hold its shape. Allow the dough to rest for five minutes.
Dont be too frustrated if this stage is difficult for you. Learning the right consistency of dough during and after kneading is truly more art than science, and can be best learned through experience. Resist the urge to add too much flour. With whole grain, adding too much flour will result in a dense and crumbly, dry bread.
5. Continue Kneading Into A Round Ball
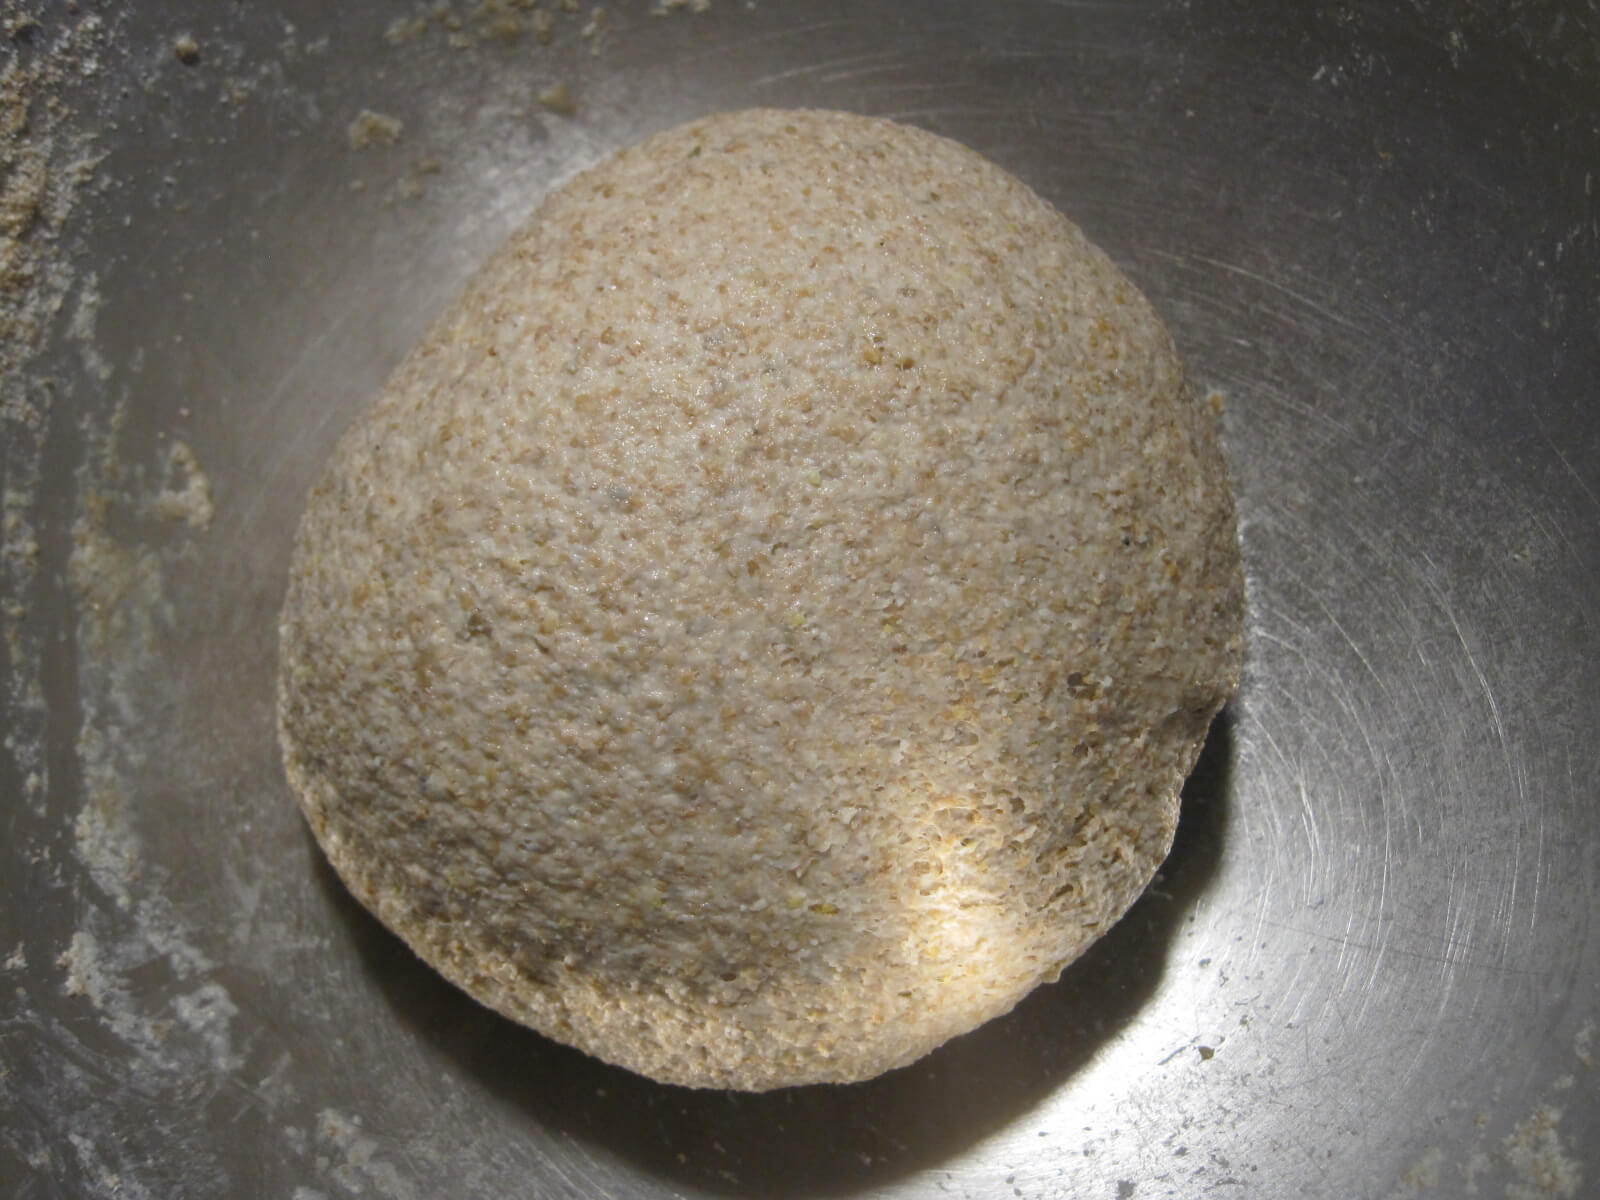
Knead for about 3 to 5 more minutes with a wet hand. By this point, the dough ball should be smooth. Cover and allow it to rise in a warm place for 2 to 3 hours.
6. Punch The Dough And Allow It To Rise
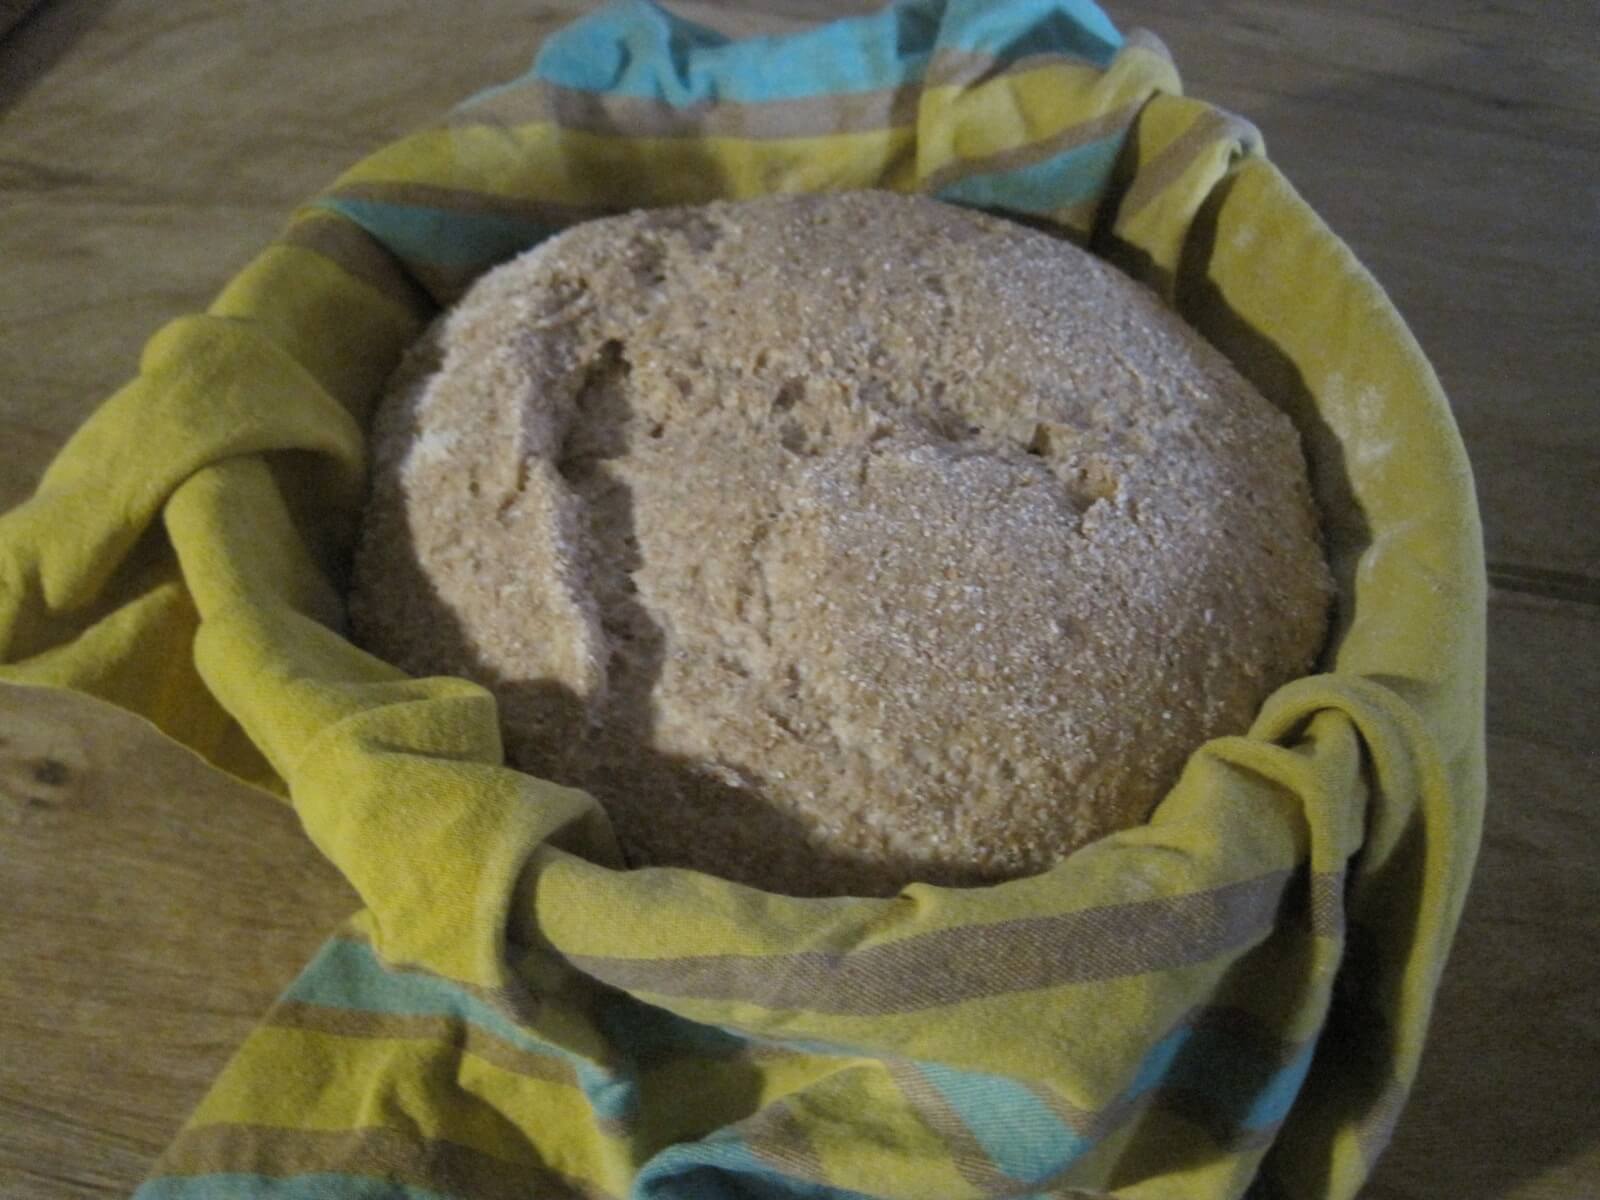
Gently punch down the dough mass, shape into a round boule (shaping tutorial here), and place in a banneton lined with flour-dusted linen. If you dont have these traditional bread-raising baskets, a flour-dusted cloth napkin in a large mixing bowl can also work. Allow to rise again in a warm place for at least three hours.
7. Preheat The Oven And Prepare Your Baking Cloche And Stone
Preheat an oven to 450 degrees Fahrenheit. If you have a cast-iron cloche, preheat the empty cloche for 25 minutes as the oven heats. If you are using a cloche and also have a baking stone in your oven, make sure it is on a rack below the cloche, not in direct contact with it. If you are using a baking stone alone, place it on the second-lowest rack in your oven. If you dont have these things, a cookie sheet is fine.
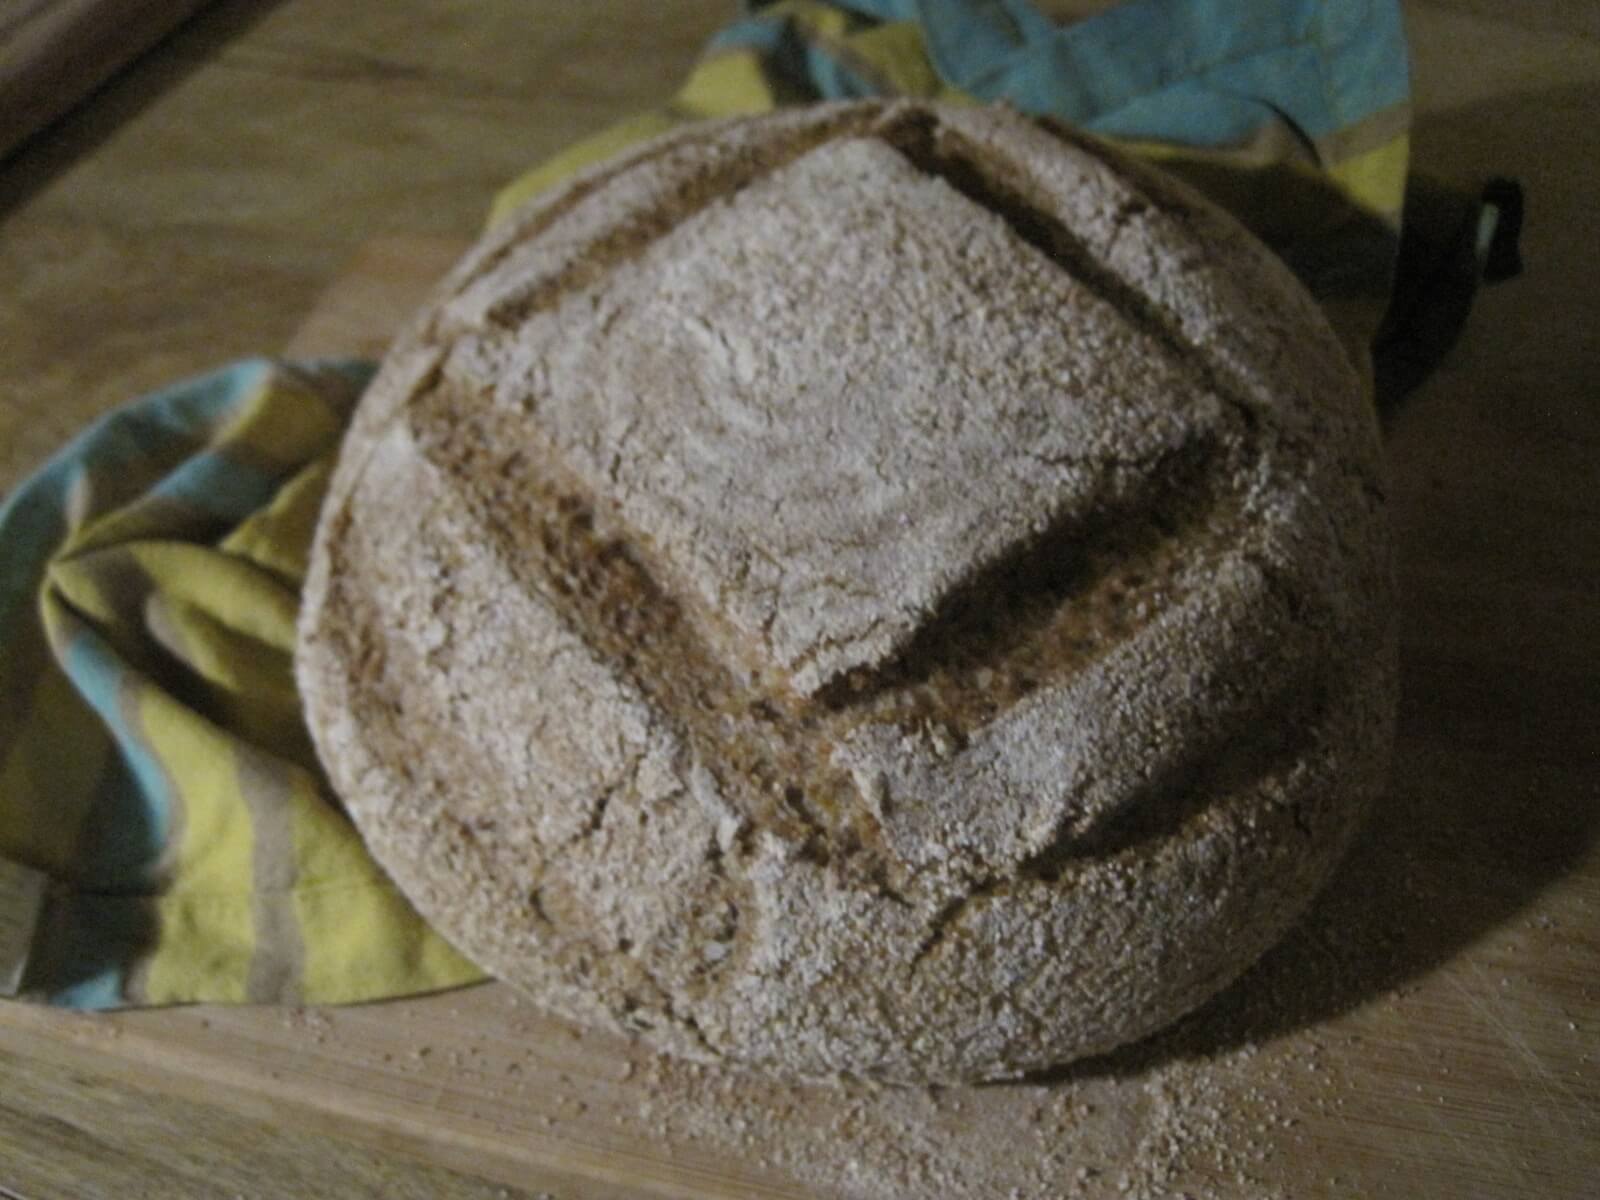
8. Dust The Cloche And Prepare The Loaf
Carefully remove the hot cloche from the oven, then dust the bottom of the cloche with cornmeal, or if using a pizza peel or cookie sheet, dust the peel with cornmeal. Turn the loaf onto the cornmeal, and slash the top with a serrated knife to allow for expansion in the oven.
Cover with cloche top (if applicable), slide onto a pizza peel (if applicable), and place in the oven for 25 minutes.
9. Reduce Heat And Check The Loaf
Reduce the heat to 425 degrees, remove cloche top, and bake for 15 to 20 minutes longer, or until the internal temperature of the loaf registers somewhere between 190 and 200 degrees Fahrenheit. A hollow sound produced by tapping the base of the loaf is the traditional method for testing doneness.
10. Allow Your Loaf To Cool And Enjoy!
Allow the loaf to cool on a drying rack for 10 minutes before slicing, and then enjoy with lots of butter and homemade preserves. It should last for around five days (wrapped in a cloth napkin) getting slightly more sour with every passing day although our bread never lasts that long!
Wild Yeast Or Store-Bought?
When reading sourdough bread recipes online, youll often see that both professionals and home bakers combine the sourdough starter with store-bought yeast to make sure the process works. This is not only unnecessary; it may hamper the success of your bread. Wild yeast and store-bought yeast are different materials entirely.
Wild yeast is the common name for Saccharomyces exiguus, a naturally-occurring yeast that varies fascinatingly by region. The starter that youre going to make for bread baking is technically a leaven which is a mixture of wild yeast and acid-producing, acid-tolerant bacteria.
Related Post: How To Make Irish Soda Bread
The two organisms work together to ferment dough, produce the carbon dioxide bubbles that aerate and lift the loaf, and provide the distinctive sour taste of sourdough. I love natural yeast because it is specific to place. The starter I ferment in my Ozark kitchen will be different than the one you make in yours. You cant get much more locally harvested than that!
In contrast, store-bought yeast is Saccharomyces cerevisiae. It was originally a byproduct of the brewing industry but has been selectively bred in laboratories since the 1840s to shortcut the long fermentation process in favor of quick gas production. Commercial yeast doesnt form a relationship with any bacteria which is why bread thats made with it lacks that distinctive sourdough acidity.
The rapid rise provided by lab-refined yeast may get you a loaf in record time, but many of the minerals and nutrients in wheat will remain in a form that is relatively inaccessible to the human body. Without the acidification of being cultured from a long, fermenting rise, bread just wont offer you the same food value.
When you understand this difference between the active, bubbling culture in your jar and the packet of dried, pale pellets that you get from the store, youll finally be on your way to trusting your starter to let it raise your bread, muffins, and biscuits on its own merit. It may take longer, but its worth it.
The Benefits Of Wild Yeast
The long fermentation process used to make sourdough products doesnt just give it a complex flavor, it also does you the service of predigesting your food, making it far easier to benefit from the nutrition otherwise locked away in wheat.
There is considerable evidence that those with a sensitivity to gluten may benefit from long-fermented sourdough products. Though they may not be able to eat wheat products made with quick-rise yeasts, many gluten-sensitive individuals can eat organic, sourdough-leavened bakery without problems.
The health benefits notwithstanding, the difference in eating experience between a store-bought, chemical-laden loaf of bread and a crusty, wholegrain sourdough loaf are nothing short of extraordinary. After biting into a complexly flavorful, toothsome, bite of homemade bread, the flabby, featureless, store-bought stuff can seem downright insipid.
If youre as absurdly passionate about real sourdough as I am, youll not have any trouble finding a daily use for your sourdough starter. If you start falling into the deep end of bread independence, you may even find yourself grinding and blending your own flour (it really makes a difference), geeking-out over excellent books like The Bread Builders or anything by Peter Reinhart, and upping the consistency of your baking game by learning bakers percentages. I challenge you to give it a try. Reclaiming bread independence is a delightful, healthy, and delicious endeavor.
If you have any questions or need help troubleshooting problems with a starter or loaf of bread, let me know in the comments below!